Portainer: Tips and Tricks#
This guide provides a quick summary of the best way to use Portainer for AusCAT related tasks such as deployment of AusCAT Docker stacks, interactively inspecting containers and rapidly updating Docker containers with the latest images.
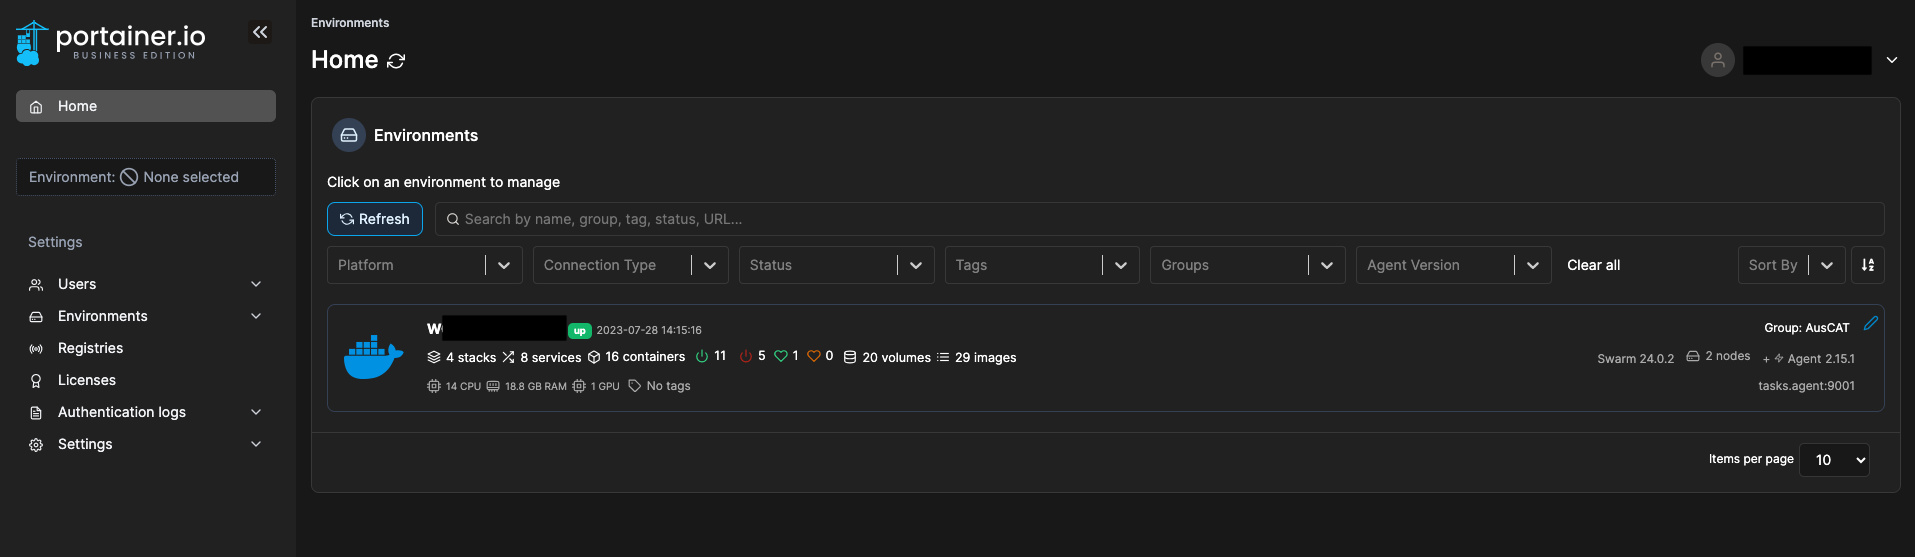
Home Page#
On the left-hand side, you can click on the Home button and see an overview of your environments along with vital statistics about each.
For example, In AusCAT, you will see a Docker icon as the primary environment, it shows the number of Docker stacks, services, containers, volumes etc., on the host machine.
Your currently selected environment will be shown by the connected Status on the right. Typically, one environment will be configured for your AusCAT node, but multiple instances are possible if other Docker Swarm agents are deployed across different VMs at your site. We’ll assume only one environment is configured as this is the most likely case across the AusCAT network.
Stacks#
This section can be used to deploy new AusCAT stacks (for testing or production purposes), without the need for using the command line to deploy any of the AusCAT tools.
Add a new Stack#
When creating a new Stack, we typically use the Web editor build method which allows us to paste into the editor a Docker Compose YAML configuration of a stack we’d like to deploy. You can find the YAML template that we use for AusCAT Docker stack here, which can be copied and pasted into this editor box.
Note: We recommend saving the YAML that you use in this Portainer setup somewhere on your system (eg. on the same VM’s file system or your secure shared drive), as Portainer does not persist these YAML’s. Subsequently, if you do save the YAML configuration into a
.ymlfile, you can use theUploadbuild method to build your stacks from that same file rather than copy/pasting it into the Web editor.
Inspecting Stacks#
Once a Stack has been deployed, monitoring its services’ status is quite convenient through Portainer. Here is an example of a deployed AusCAT production stack:
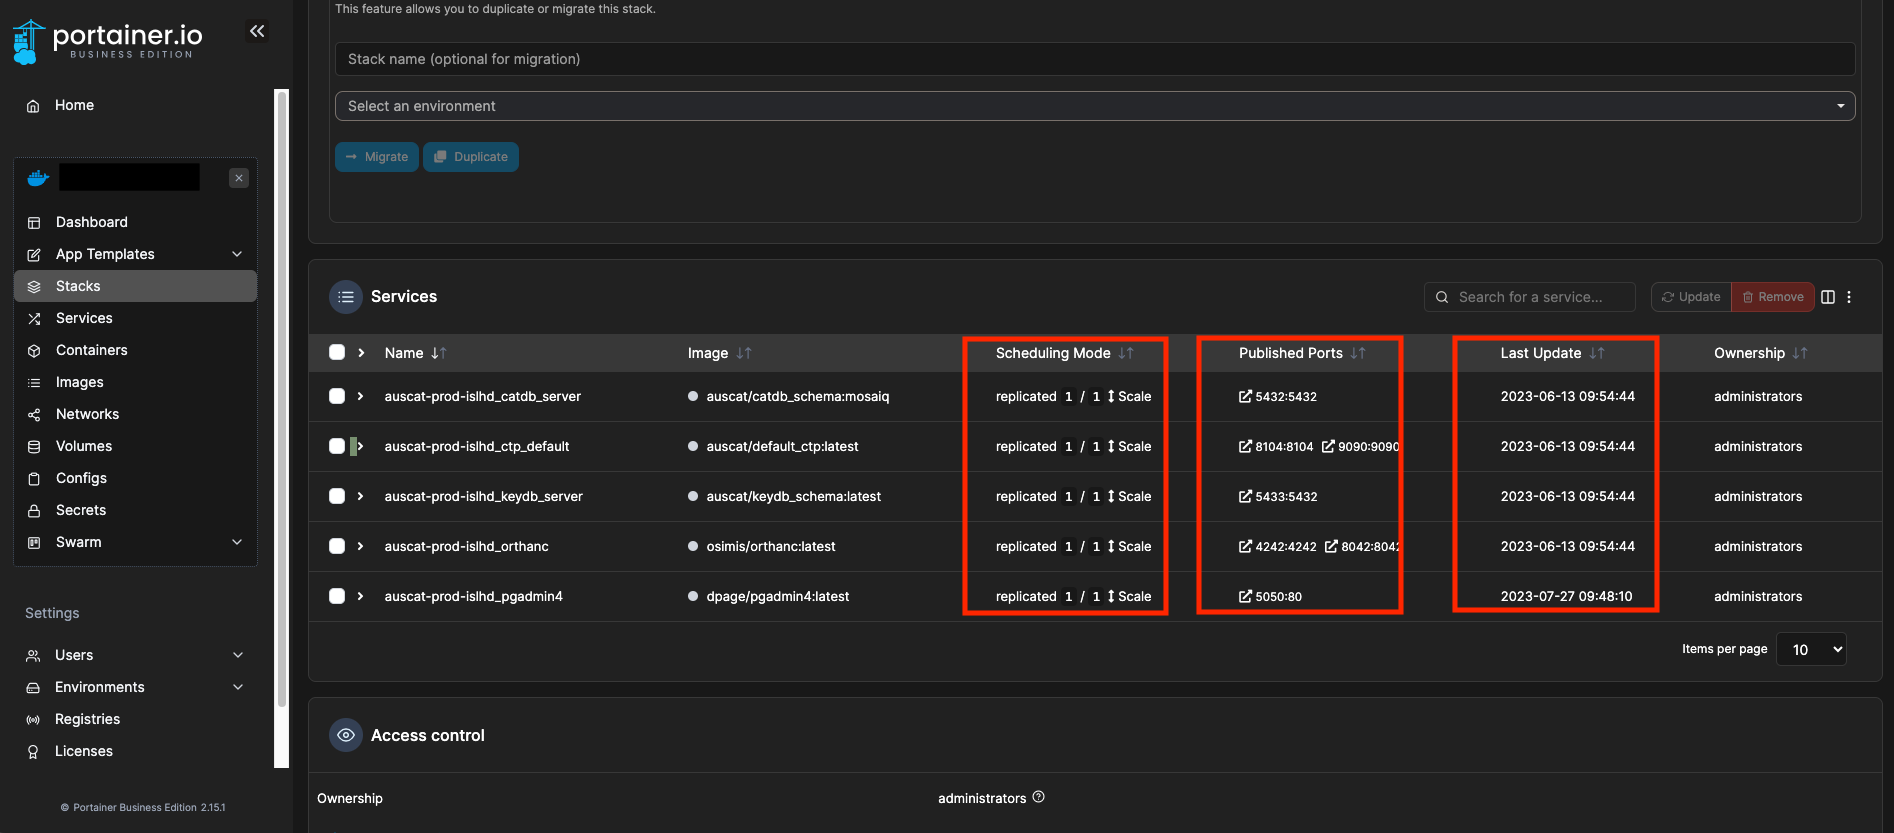
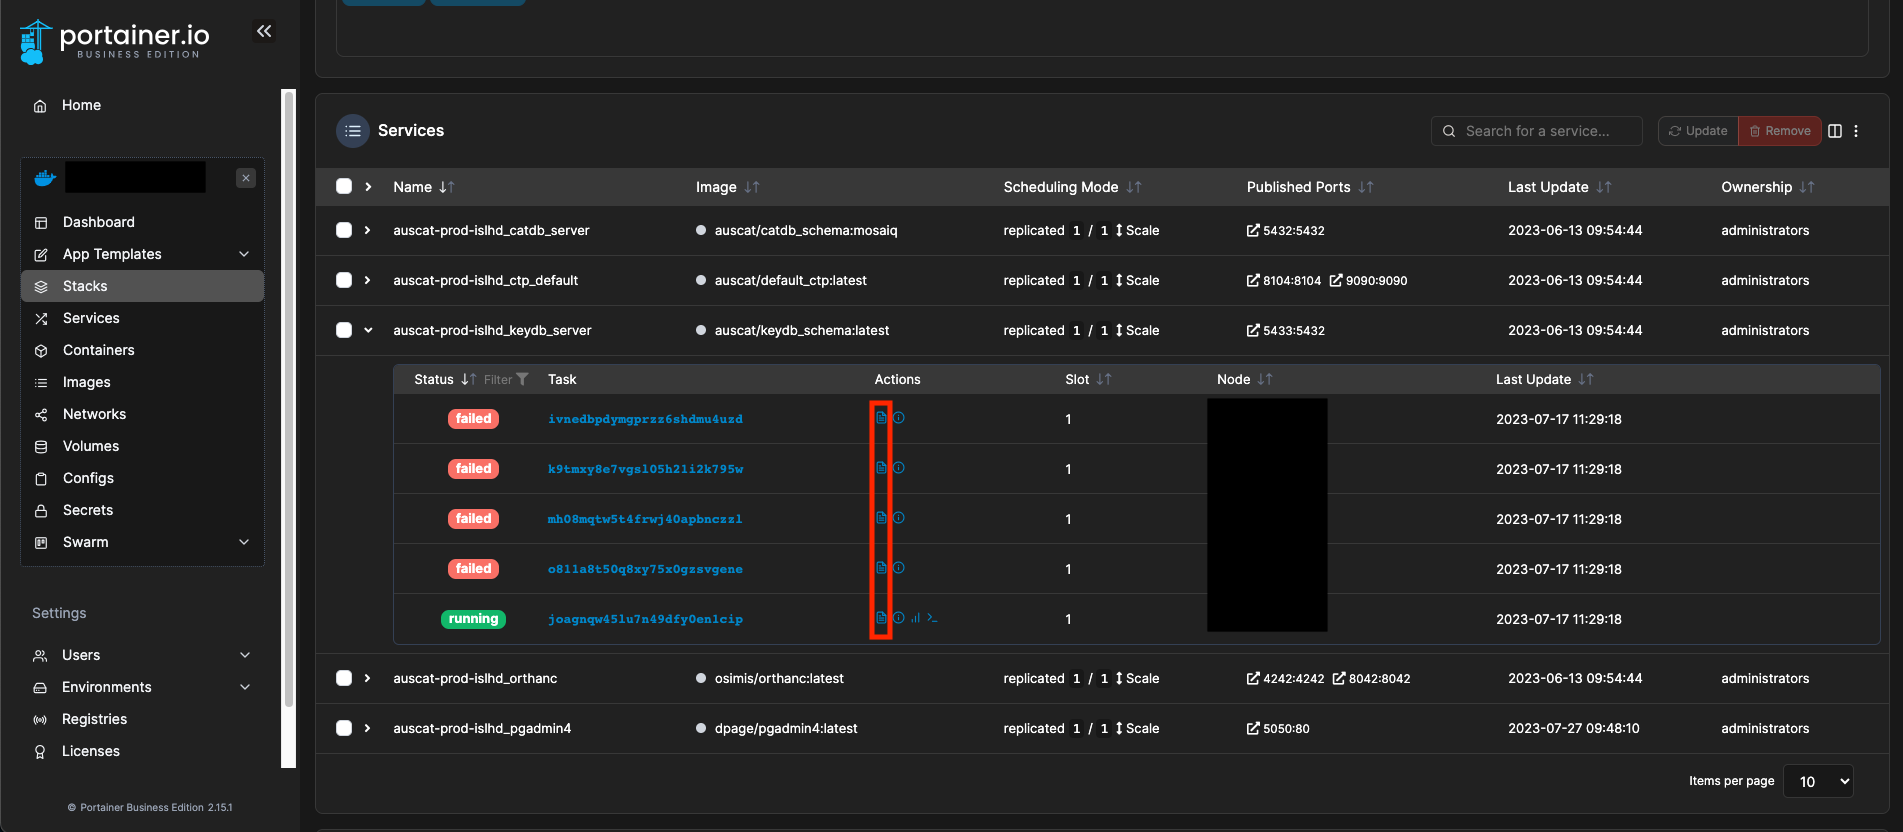
From here we can quickly identify if services are running (under the Scheduling Mode column), on which ports the different services have been published and the last updated time for each service. Also, if a service is not running (eg. replicated 0/1 Scale), we can click on the dropdown for that service and inspect its Logging output (highlighted in Red below) to debug the issue:
Updating Services#
From this Stacks section, updating services is straightforward. You can select the services that you wish to update using the checkbox on the far left of the menu and then clicking on Update. This will prompt you with the following:
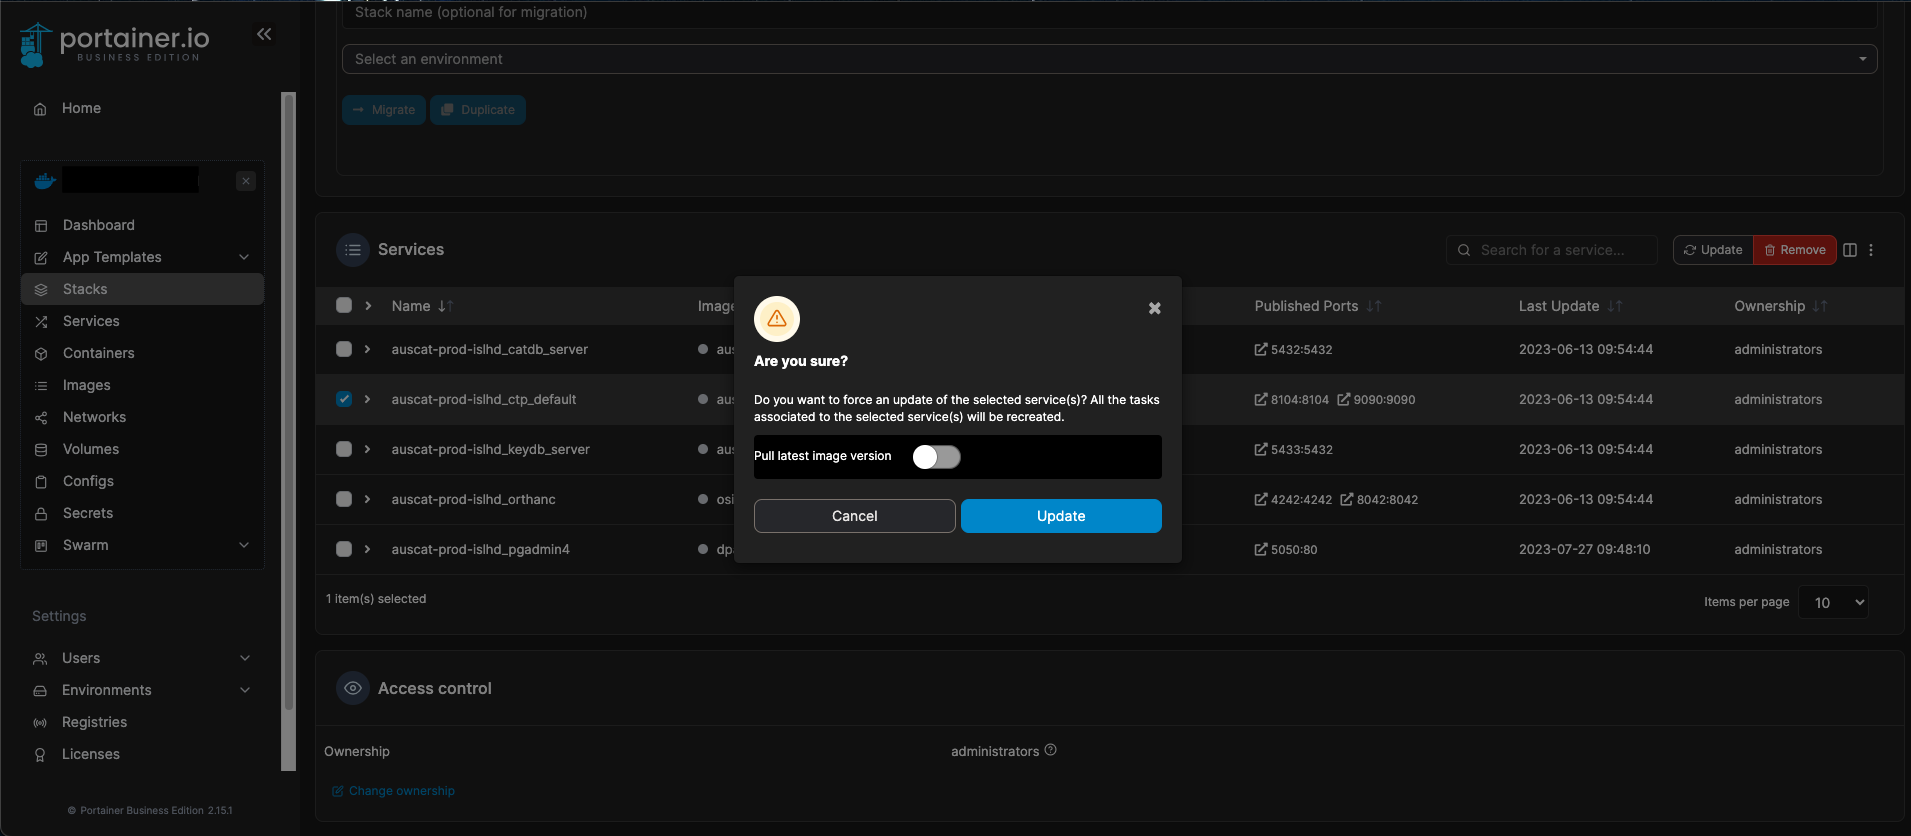
If you wish to update the service with the latest image that can be pulled from the source registry into your agent’s local registry, then make sure to toggle the Pull latest image version option. Otherwise, if you would like to simply refresh the service’s container with no image update, do not select this option.
Containers#
This page shows a list of all containers on the host agent. Unlike the Stacks and Services pages, this shows all containers that are on the host, not only ones that are bundled into a Stack. This includes active containers (running in green), stopped containers (exited in red) or newly booted containers that are setting up (created in blue).
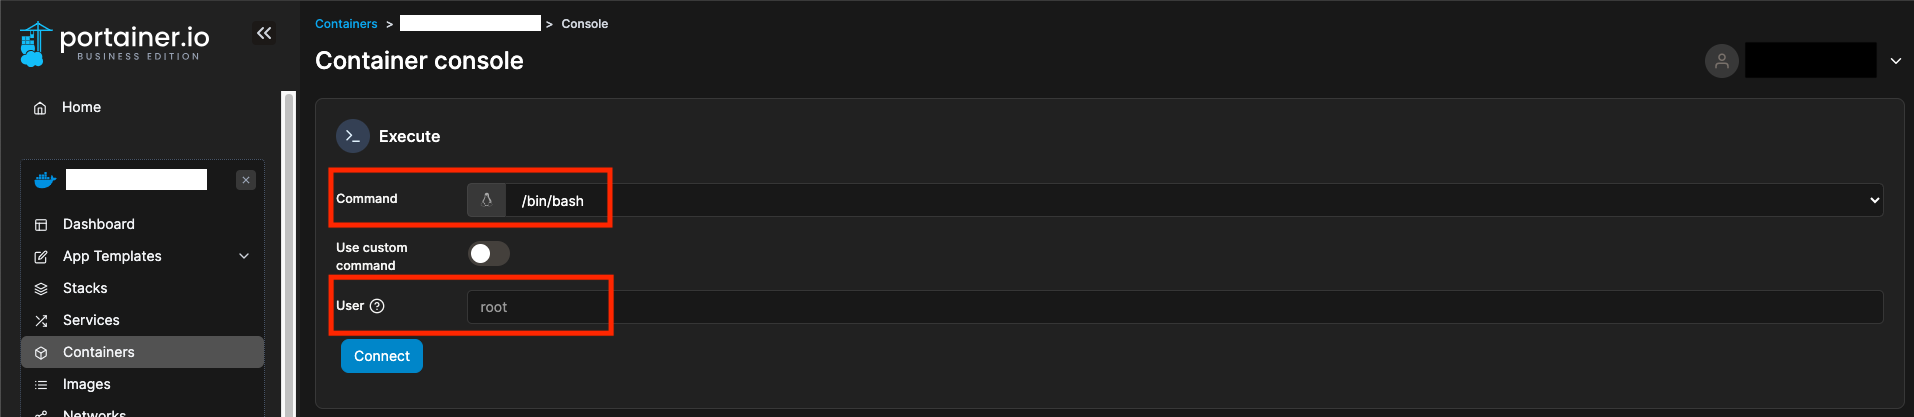
Each container comes with the option of jumping into a interactive secure shell (>_ icon under the Quick Actions column). This is extremely helpful for inspecting things inside of the container like checking if mounting paths are set correctly, or inspecting data that is encapsulted within the container environment and be only be accessed from within it. By default, you login as a root user into a Bash shell with sudo permissions, but this can be configured to another user and different shell or command that exists within the container (highlighted in red):
GPU configuration through Portainer#
A limitation with Docker Swarm Stacks used in Portainer is the inability to deploy services attached to GPUs. This is problematic for AusCAT projects such as the Cardiac Dosimetry Comparison where a GPU speeds up the auto segmentation process significantly.
A work around is to get a single container setup with GPU utilisation, rather than configuring an entire stack as Portainer allows individual containers to be setup with one. A limitation with this is if your service requires other services to be deployed along with it to run smoothly, then you’ll have a disjoint between the 2 as each will now need to be deployed separately and manually inspected to confirm that they’re both running.
To do this:
Access the
Containerssection on PortainerClick on the
Add containerblue buttonConfigure your container with an approriate name, image, network ports configuration.
Note: All the configurations that you’ll set in the YAML for when you deploy your service using a stack will need to be configured in this section (eg. environment variables, secrets, volumes, networking, etc…)
Scroll down to the
Advanced container settingsand configure other options you need accordingly. Most likely you’ll need:Volumes: setup any volume management that you’ll need. You can configure a Docker Volume or a bind mount depending on your need service needs.Env: configure environment variables here.
For the GPU:
Runtime & Resources: here is where the GPU utilisation is configured for the container. Toggle under the GPU heading theEnable GPUoption, next to it you can specifiy which of the GPU’s (if there are mutiple instances running) that the container may utilise. By default, the “Use all GPUs” option will be provided.
Once all the configuration options have been set, click on the
Deploy the containerblue button to deploy the container which can utilise the configured GPU/s.
Updating Secrets#
When utilising Secrets for your Docker Stacks that you have created through Portainer, you may find that passwords or other sensitivie info need to change and recongifured. To update pre existing Secrets in Portainer: 1. Stop the relevant Docker Stack (individual Services) that make use of the secret. A Stop will suffice, no need to delete the stack (and you probably wouldn’t want to delete your Stack/Services in any case…). 2. Delete the relecant secret from the Secrets section in Portainer. You can’t edit an existing one, so you will need to delete the current secret. 3. Create a new Secret with the same name you are using in the previous verion, with the new secret value you wish to use. 4. Restart your Stack or Service/s and the new Secret shall be reconfigured for use in your relevant containers.